How to display messages sent from Ozeki 10 SMS Gateway
You are able to connect Ozeki 10 SMS Gateway to Ozeki SMS Wall for incoming SMS messages to appear on the display. The incoming SMS messages can arrive through any connection that is supported by Ozeki 10 SMS Gateway.

STEP 1: Create SMPP user in Ozeki SMS Gateway
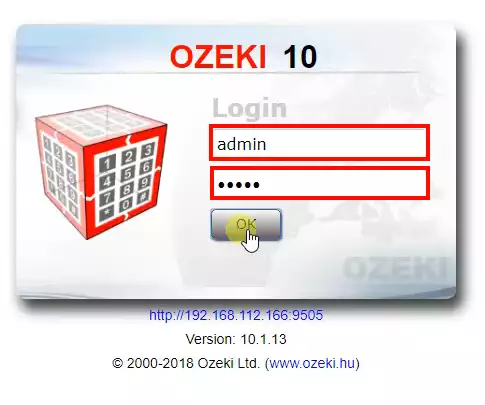
Before your start to create SMPP User you need to login to the SMS gateway (Figure 1) using a web browser as administrator, and you need to perform a few simple steps. For configuration we recommend to login using the administrator account. The administrator account username is "admin", and the password is the one you provided during install.

The first step is creating an SMPP user in Ozeki SMS Gateway. You will connect this user to Ozeki SMS Wall, so every SMS sent to Ozeki SMS Gateway can be forwarded the SMS Wall.
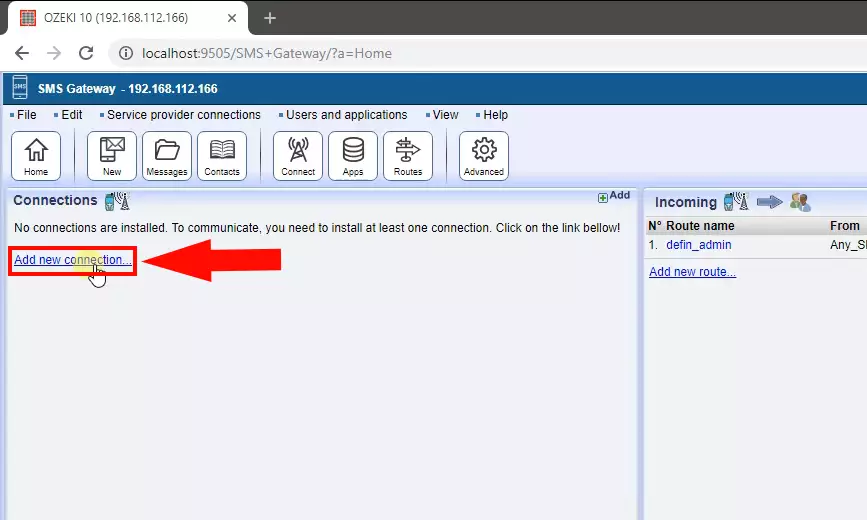
To create a new SMPP client connection after login, you need to click on the 'Add new connection' link in the management console of the Ozeki 10 SMS Gateway app. This link is located in the Connections panel below the text "No connections are installed..." (Figure 2). This link will bring up a list of available protocols. Note that SMPP is an SMS protocol that can be used to send SMS messages.

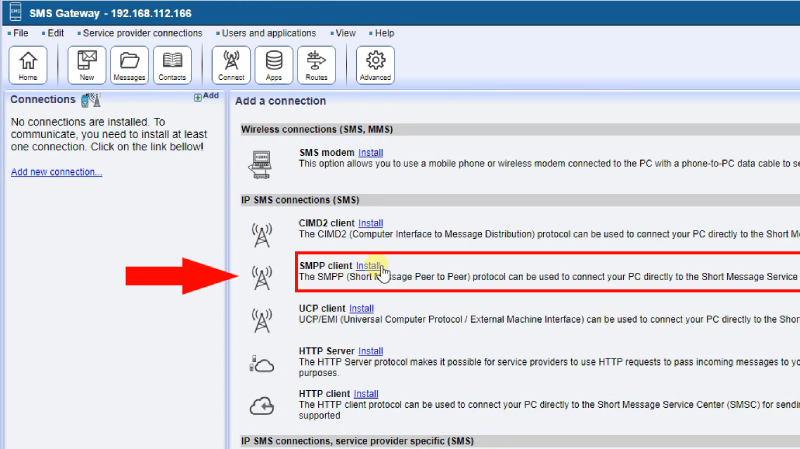
To install the SMPP client connection, you will have to select SMPP client from the available connections list. The SMPP client can be found in the IP SMS Connections section (Figure 3). You need to click install to install the SMPP client. You will use a client connection because you wish to connect the SMS gateway to an SMS service provider over the Internet.
Select the 'SMPP client' from the Add a connection list and click on Install.

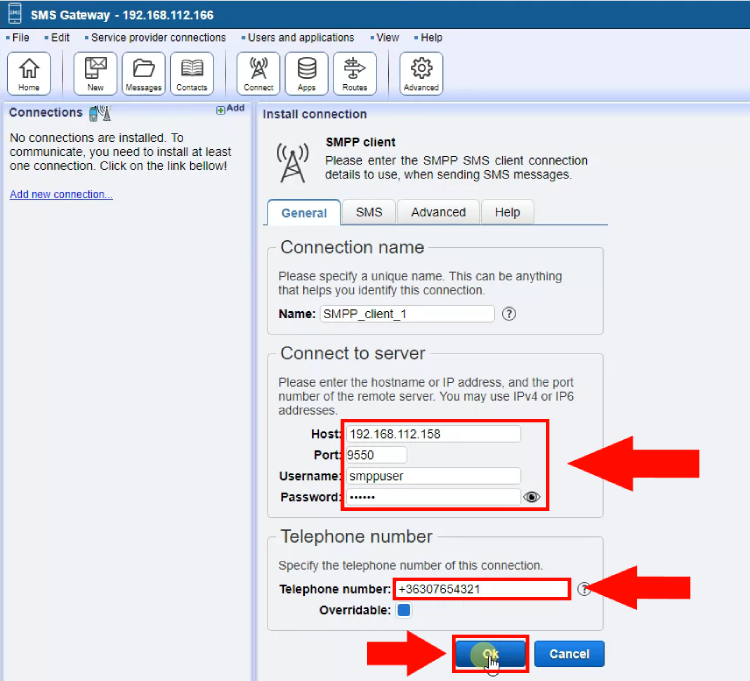
Now it is time to configure your SMPP client connection, you need to provide the host name and port number of the SMPP service, your SMPP credentials and your must specify telephone number associated with this connection. There could be more than one phone numbers associated with this connection. In this case provide the first one and check the overridable checkbox. If this checkbox is checked, you will be able to use all phone numbers as sender IDs. You cannot use spaces or any other special characters. When you are ready click 'Ok' (Figure 4). If you need more details to configure SMPP Client please visit the following link: https://ozeki-sms-gateway.com/p_7617-smpp-connection-to-sms-service-providers.html

Your Ozeki SMPP user is successfully created. Later on you will need the username and password in Ozeki SMS Wall.
Click on 'Management' to see the routing table (Figure 5 - 3).

It is necessary to route incoming calls to your freshly created Ozeki SMPP user.
Click on 'Add new route...' in the 'Incoming' section to configure path (Figure 6).

Select destination user and click 'Ok' to insert new path into the routing table (Figure 7).

If you look on the routing table you will see your freshly added row in the 'Incoming' section (Figure 8).

STEP 2: Create SMPP connection in Ozeki SMS Wall
Now it is time to start Ozeki SMS Wall. First, you will find yourself on the home page. Click on 'Connect to the mobile network' on the left side of the home page (Figure 9).

Click on the blue 'Create new connection' button and select 'SMPP' from the opening box on the right side (Figure 10).

Now it is time to fill the 'Connection details' form in Ozeki SMS Wall.
Before doing it, please check the IP address of NG. (Figure 11)

The default port number should be 8500. The username and password should be equal to the SMPP username and password combo you have previously created in Ozeki SMS Gateway (Step 1) Click 'Ok' to continue (Figure 12).

In the 'Connections' list you can find your setup SMPP connection with a red X next to it. The red X means it is not yet connected. Click on the 'Connect' button to connect to the Ozeki SMS Gateway SMPP user (Figure 13).

It can take up to a minute for the green tick to appear. After it has appeared click 'Home' to return to the Wall (Figure 14).

STEP 3: Display a test SMS on the wall by sending it to NG
The time has come to test your SMS Wall. Please send an SMS to the phone number registered to NG (Figure 15).

In Ozeki SMS Wall you will see the SMS arrived in the 'Incoming messages' section (Figure 16). In this section you can delete incoming messages before they appear.

After the time delay has passed the message automatically appears on the Wall (Figure 17).
You can set it to fullscreen mode if you would like your audience to easily read it. Just click on 'Fullscreen' (Figure 17).


 Sign in